Shrubs
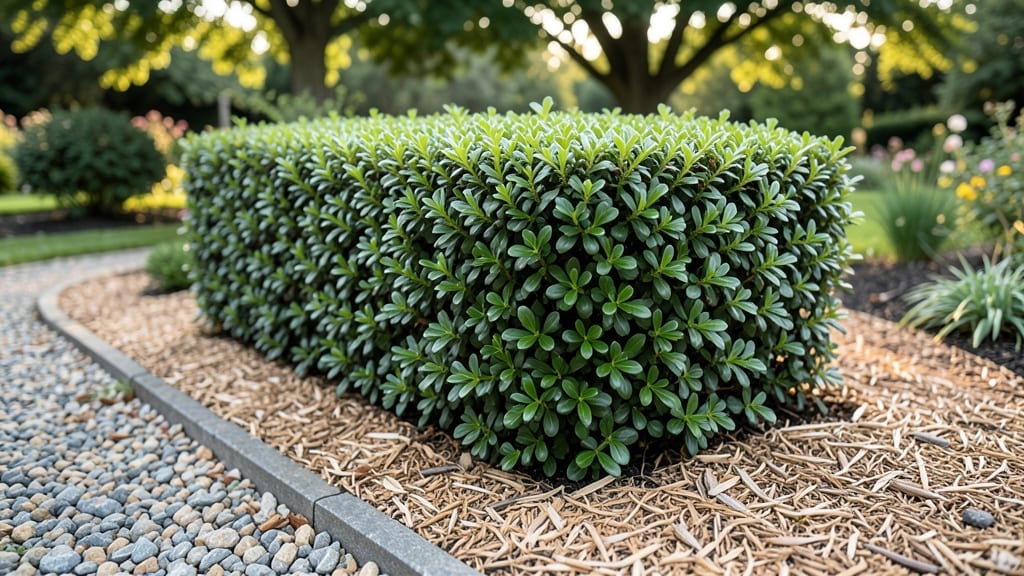
The right boxwood foundation planting can turn a plain house edge into a timeless landscape feature that never goes out of style. ✨ I’ve used boxwoods to frame my front porch for years, and they’ve held their shape through winters and summer heat—no fuss, just classic green.
The key is picking the right size and spacing them properly so they grow into a neat, unbroken hedge that makes the house look intentional, not thrown together.
Start with dwarf varieties like ‘Green Velvet’ for tight spaces or standard boxwoods like ‘American Holly’ if you’ve got room to play. Plant them 12 to 18 inches apart in well-drained soil, and mulch heavily to keep weeds out and moisture in.
Pair them with low-growing perennials like creeping thyme or ornamental grasses to add texture without stealing the show. The goal is clean lines and year-round structure—no dead branches or messy regrowth.
Once established, boxwoods need minimal upkeep: a light trim in late spring and a deep watering every week or so during dry spells. They’ll stay lush and dense, framing your home like a living picture frame. The best part?
They handle pruning like champs, so you can shape them into sharp edges or soft curves without stress. Think of them as the unsung heroes of curb appeal—they don’t demand attention, but they make everything around them look better.
For extra impact, add seasonal interest with spring bulbs like daffodils at the base or fall mums for color. Just avoid planting anything too tall or aggressive nearby—the boxwoods are the stars here.
With the right setup, your foundation planting will look polished for decades, requiring only occasional trims and a little love. Here’s how to make it happen without the headache.
📚 In This Guide
- What you need
- Instructions
- Tips and common mistakes
- Wrapping up and next steps
What you need
- ● Boxwood shrubs: 3–5 plants (depending on foundation length), 2–3 ft tall, spaced 3–4 ft apart.
- ● High-quality soil: 2–3 bags of organic topsoil (1 cubic yard per 10 linear ft of planting).
- ● Mulch: 2–3 bags of shredded bark or pine straw (for moisture retention and weed control).
- ● Fertilizer: Slow-release granular fertilizer (10-10-10 ratio, 1 lb per plant).
- ● Garden gloves: Heavy-duty, nitrile-coated for durability.
- ● Watering can or hose: With a gentle spray nozzle for post-planting hydration.
- ● Pruning shears: Sharp, bypass-style for clean cuts.
- ● Shovel & spade: Round-point shovel for digging, spade for edging.
- ● Measuring tape & stakes: To mark planting locations and spacing.
- ● Level: To ensure even planting depth and alignment.
- ● Planting holes: Pre-made from a bulb planter or auger (saves time!).
- ● Root stimulator: Powder or gel to promote faster root growth.
- ● Edging tools: For crisp, professional borders around mulch.
- ● Drip irrigation kit: For long-term watering efficiency.
- ● Knee pads: For comfort during extended planting sessions.
Step-by-Step guide for boxwood foundation planting
Here's how to create a polished, evergreen border that frames your home beautifully.
🪴 Step 1: Plan Your Layout and Dig Holes
Start by measuring the foundation and marking planting spots 12-18 inches apart—this spacing gives mature boxwoods room to grow without overcrowding. I use wooden stakes and string to create a straight line, adjusting for any architectural features like windows or doors. Dig holes twice as wide as the root ball and 6 inches deeper than the container size to encourage root spread.
Loosen the sides of each hole with a shovel or trowel to help roots penetrate the soil. If your soil is heavy clay, mix in 2 inches of compost at the bottom of each hole to improve drainage. This prevents root rot, which is a common issue with boxwoods planted in compacted soil.
🌱 Step 2: Remove Plants from Containers and Prepare Roots
Gently squeeze the sides of each container to loosen the root ball before sliding the plant out. If roots are circling tightly, use your fingers to tease them apart—this prevents girdling, which can strangle the plant as it grows. Place each boxwood in its hole so the top of the root ball sits 1 inch above ground level. This ensures the plant won’t settle too deeply over time.
Fill the hole with native soil, pressing lightly around the edges to remove air pockets. Water deeply to settle the soil and eliminate gaps. You’ll see the soil level drop slightly as it compacts—top off with a little more soil if needed. Avoid packing the soil too tightly, as this can restrict root growth.
☀️ Step 3: Mulch and Water for Establishment
Spread 2-3 inches of mulch over the soil surface, keeping it 6 inches away from the plant stems to prevent rot. I use shredded bark or pine straw because they break down slowly and improve soil structure over time. Mulching also helps retain moisture and suppress weeds, which is especially important during the first year.
Water the newly planted boxwoods deeply once a week for the first month, adjusting for rainfall. You’ll know they’re getting enough water when the soil feels moist 2-3 inches below the surface. Avoid overhead watering, as wet foliage can lead to fungal diseases. Instead, use a soaker hose or water at the base of the plants.
✂️ Step 4: Prune and Maintain for Long-Term Health
Prune boxwoods lightly in early spring to shape them and encourage bushiness. Use sharp pruners to make clean cuts just above a leaf bud or branch junction. Avoid heavy pruning, as boxwoods respond best to gradual shaping. I trim about 10-15% of the plant’s growth each year to maintain its natural form without stressing it.
Fertilize in early spring and mid-summer with a slow-release, balanced fertilizer to support steady growth. You’ll notice healthier foliage and fewer brown or yellow leaves if the plants are well-fed. Monitor for pests like boxwood leafminers or spider mites—early intervention with insecticidal soap keeps them in check.
⏰ Step 5: Monitor and Adjust Over Time
Check your boxwoods regularly for signs of stress, such as wilting, yellowing leaves, or stunted growth. These can indicate issues like overwatering, underwatering, or poor drainage. Adjust your watering schedule as needed, especially during hot summers or dry spells. Boxwoods are drought-tolerant once established, but young plants need consistent moisture.
After the first year, you can gradually reduce watering to every 2-3 weeks, depending on rainfall. Mature boxwoods thrive with minimal care, but a little attention goes a long way in keeping them lush and vibrant. With proper planting and maintenance, your foundation border will provide structure and beauty for decades.
Tips & tricks for perfect boxwood foundation planting
A few strategic moves can transform your boxwood foundation from good to stunning—here's how to avoid common pitfalls and create a border that lasts for decades.
Precision Planting: In Step 1, when marking your 12-18 inch spacing, use a measuring tape and mark every 15 inches first, then adjust the last few to hit your exact foundation length. This creates that perfect straight line without guessing. I also recommend using a level when marking stakes to ensure your border stays perfectly horizontal, especially along uneven foundations.
Root Care Secret: The 6 inches deeper holes in Step 1 aren't just about space—they create room for roots to spread horizontally. When you place your boxwood, gently wiggle it in the hole until it feels snug. This prevents settling later, which can cause the plant to sink too low in the soil and potentially suffocate the stem.
Mulching Mastery: That 2-3 inch mulch layer in Step 3 is your secret weapon against weeds and moisture loss. But here's the trick: refresh your mulch every spring by spreading a new 1-inch layer over the existing mulch. This prevents compaction and maintains the proper depth without smothering the plants. I use pine straw because it breaks down slowly and naturally acidifies the soil slightly, which boxwoods love.
Watering Wisdom: The once-a-week deep watering in Step 3 should actually be done in the morning so the foliage has all day to dry. I check moisture by sticking my finger 2-3 inches down—if it feels dry, it's time to water. Overhead sprinklers can create fungal problems, so if you don't have a soaker hose, water at the base using a watering can with a long spout to direct the flow precisely where it's needed.
Pro Tips for Boxwood Foundation Planting
- A few strategic moves can transform your boxwood foundation from good to stunning—here's how to avoid common pitfalls...
- Precision Planting: In Step 1, when marking your 12-18 inch spacing, use a measuring tape and mark every 15 inches fi...
- Root Care Secret: The 6 inches deeper holes in Step 1 aren't just about space—they create room for roots to spread ho...
Frequently asked questions
Got questions about creating a stunning boxwood foundation planting? You’re not alone! Here are some of the most common inquiries—plus straightforward answers to help you design with confidence.
What’s the best spacing for boxwoods along a foundation?
For a neat, structured look, space boxwoods 3 to 4 feet apart for medium-sized varieties (like ‘Green Velvet’) or 4 to 5 feet apart for larger types (e.g., ‘American Holly’). This ensures airflow, reduces disease risk, and allows for easy pruning. Pro tip: Use a tape measure to mark spots before digging!
When is the ideal time to plant boxwoods near a house?
Plant in early spring or fall when temperatures are mild (50–70°F). Avoid extreme heat or frost, as these stress young roots. Bonus: Fall planting gives roots time to establish before winter, while spring lets you enjoy growth season. Just avoid planting in late summer—it’s too hot for recovery!
Can I use other shrubs instead of boxwoods for a foundation planting?
If boxwoods aren’t your style, consider holly, juniper, or dwarf lilac for structure. For color, try azaleas or camellias (though they need more maintenance). Just ensure alternatives match your climate zone and foundation height. Example: ‘Dwarf Burford’ holly is a boxwood lookalike with glossy leaves!
Why are my boxwood leaves turning brown or yellow?
Brown/yellow leaves often signal overwatering, underwatering, or fungal issues. Check soil moisture (it should stay evenly damp, not soggy). If leaves curl or drop, it could be boxwood blight—remove affected plants and sterilize pruners. Prevention tip: Mulch 2–3 inches deep to retain moisture without suffocating roots.
How do I shape boxwoods for a polished foundation look?
Use hand pruners or hedge shears to trim after new growth appears in spring. For a clean edge, cut at a 45° angle to reduce water pooling. Shape hack: Lightly sketch your desired outline with chalk first, then prune gradually over 2–3 sessions to avoid stressing the plant.
Wrapping up and next steps
Planting boxwoods as a foundation landscape isn’t just about aesthetics—it’s an investment in timeless beauty, low-maintenance elegance, and curb appeal that grows with your home. With the right soil prep, spacing, and care, your evergreen hedges will thrive for decades, offering year-round structure and privacy.
Now that you’re armed with the how-to, take the next step: sketch your design, gather your tools, and start digging! 🌱 Your future landscape (and your future self) will thank you.
Pro tip: Snap a photo of your layout before planting—it’s a game-changer for future pruning and maintenance! 📸