Flowers
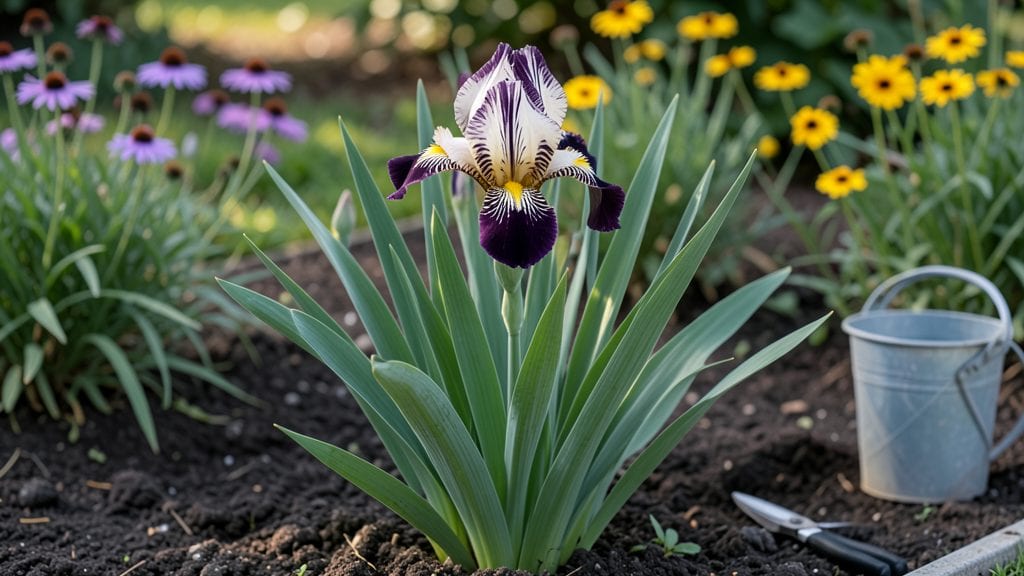
Zebra iris plants bring wild, striped drama to your garden with their bold purple-and-yellow blooms that catch every eye. 🌟 I’ve grown them for years, and they’ve never failed to deliver—just plant them in full sun, give them well-draining soil, and watch them reward you with weeks of showstopping color.
The secret isn’t complicated: these irises thrive when they’re not smothered in rich compost or soggy soil, and they’ll naturalize over time, spreading into a stunning, low-maintenance border.
Their striking foliage adds texture even when they’re not blooming, and the rhizomes (those thick, horizontal roots) are surprisingly tough once established. You’ll need about 2 feet of space between plants to let them spread, and they’ll reward you with blooms in early to mid-spring that last for weeks.
The key is dividing the rhizomes every 3-4 years to keep them vigorous—it’s easier than you’d think, and I’ll show you how.
By summer, you’ll have a clump of sword-like leaves and maybe a few late-season blooms, too. These plants are drought-tolerant once settled, so they’re perfect for sunny borders, cottage gardens, or even container plantings if you choose a large enough pot.
The only real challenge? Keeping them from spreading into your lawn if you’re not careful—though that’s a problem most gardeners would love to have.
If your zebra irises aren’t blooming, it’s usually because they’re getting too much shade or too much water. Yellowing leaves? That’s often a sign of overwatering or poor drainage. But once you get the basics right, they’re nearly foolproof—just plant, forget, and enjoy the show. Let’s get yours thriving!
📚 In This Guide
- What you need
- Instructions
- Tips and common mistakes
- Wrapping up and next steps
What you need
- ● Zebra iris plants: 3–5 Iris germanica or Iris xiphium rhizomes (striped varieties like 'Zebra' or 'Florentina')
- ● OR 10–20 seeds (if starting from scratch)
- ● Well-draining soil: 5–10 bags (1–2 cubic feet each) of garden soil mix amended with: 1 part perlite or coarse sand (for aeration)
- ● 1 part compost (for nutrients)
- ● Sunlight: A full-sun location (6+ hours of direct sunlight daily)
- ● Watering can or hose: With a gentle spray nozzle (to avoid damaging rhizomes)
- ● Fertilizer: Balanced 10-10-10 granular fertilizer (2–3 tbsp per plant)
- ● OR Slow-release rose/bulb fertilizer (follow package rates)
- ● Garden trowel or shovel (for planting)
- ● Pruners or sharp scissors (to trim dead foliage after blooming)
- ○ Mulch (optional): 2–3 inches of gravel, pebbles, or pine bark (to retain moisture and deter weeds)
- ○ Support stakes (optional): For tall varieties (e.g., bamboo stakes)
- ● Glove (to protect hands from rhizome sharpness)
Step-by-step guide to planting and caring for zebra iris
Zebra iris brings striking color to any sunny garden with minimal fuss—here’s how to plant and nurture these bold beauties.
🌱 Step 1: Choose the Perfect Planting Spot
Zebra iris thrives in full sun, so pick a location that gets at least 6-8 hours of direct sunlight daily. I always check for at least 4 hours of afternoon sun, as that’s when the blooms open best. The soil should drain well—zebra iris hates soggy roots. If your garden has heavy clay, amend it with 2-3 inches of coarse sand or perlite before planting.
Dig a hole that’s twice as wide as the iris rhizome but only 1 inch deep. The top of the rhizome should peek above the soil line—burying it too deep causes rot. I like to plant mine in early spring or late summer, when temperatures are mild and the plant can establish roots before stress.
🌿 Step 2: Plant Rhizomes Correctly for Strong Growth
Position the rhizome with the fanned roots facing downward and the pointy end pointing upward. This ensures the plant grows straight and blooms properly. Space rhizomes 18-24 inches apart—they spread over time, so give them room to avoid overcrowding. If planting in a row, I like to stagger them slightly for a more natural look.
Press the soil gently around the rhizome but don’t pack it down. The top should still be visible—this prevents rot and encourages strong growth. Water lightly after planting to settle the soil, but avoid soaking it. Zebra iris is drought-tolerant once established, but the first few weeks need consistent moisture to root.
☀️ Step 3: Water and Fertilize for Vibrant Blooms
Water deeply once a week during the first growing season, allowing the soil to dry out slightly between waterings. You’ll know it’s right when the top 1-2 inches of soil feel dry to the touch. Overwatering is the biggest mistake—zebra iris roots rot easily in soggy conditions. After the first year, they’re tough enough to handle dry spells.
Feed with a balanced, water-soluble fertilizer (10-10-10) in early spring, just as new growth appears. I dilute it to half-strength to avoid burning the rhizomes. Skip fertilizer in fall—it encourages tender growth that won’t survive winter. Mulch lightly with 2 inches of organic mulch in late fall to protect roots from freezing temperatures.
✂️ Step 4: Prune and Divide for Long-Term Health
Deadhead spent blooms by cutting the flower stalk back to the base once the petals fade. This redirects energy to next year’s blooms instead of seed production. I also trim any yellow or damaged leaves in early spring to keep the plant looking tidy and encourage new growth.
Divide clumps every 3-4 years in early spring or fall. Dig up the rhizomes, separate the fans, and replant the healthiest sections. Discard any mushy or shriveled rhizomes—they won’t regrow. This keeps blooms vibrant and prevents overcrowding. I replant divisions in the same spot or share them with fellow gardeners!
⏰ Step 5: Protect in Winter for Next Year’s Blooms
Zebra iris is hardy in USDA zones 3-9, but young plants or first-year growth need extra care in colder climates. Once temperatures drop below 20°F, cut back the foliage to 2 inches above the rhizome. This prevents winter damage while keeping the plant’s energy stored in the roots.
Mulch heavily with 4-6 inches of straw or shredded leaves after the ground freezes. Remove the mulch in early spring once new shoots appear. This protects the rhizomes from freezing and thawing cycles, which can crack them. With proper winter care, your zebra iris will return year after year with bold, striped blooms.
Tips & tricks for perfect zebra iris planting and care
Here's what nobody tells you about getting those showstopping striped blooms—lessons I learned after watching my first iris plants struggle.
Sunlight Secret: Those 6-8 hours of sunlight are non-negotiable, but here's the trick: position your iris to catch the 4 hours of afternoon sun specifically. That's when the blooms open fully and develop their signature striped pattern. If your garden only gets morning sun, consider a raised bed or container placement that maximizes exposure during those critical afternoon hours.
Planting Precision: When creating that 1-inch deep hole, don't just eyeball it—use a ruler or measuring stick. The top of the rhizome should be just barely visible above soil level. I've seen beginners bury them completely, which leads to rot. Think of it like planting potatoes—just enough to peek above ground. Also, that twice-as-wide hole gives roots room to spread without competing for nutrients.
Watering Wisdom: The deeply once a week rule works, but here's how to perfect it: stick your finger 1-2 inches into the soil. If it feels dry, water until moisture reaches those same 1-2 inches**. The key is consistent moisture at the root level, not surface watering. After the first year, you can stretch this to every 10 days—these plants are surprisingly drought-tolerant once established.
Winter Protection Strategy: When temperatures drop below 20°F, that 2-inch foliage trim is crucial, but don't stop there. I've found that adding a thin layer of burlap over the mulch provides extra insulation against extreme cold snaps. This simple step has saved my iris rhizomes in zone 5 winters when temperatures plunged to -10°F. Remove the burlap in early spring once new shoots appear.
Pro Tips for Zebra Iris Plants
- Here's what nobody tells you about getting those showstopping striped blooms—lessons I learned after watching my first iris plants struggle.
- Sunlight Secret: Those 6-8 hours of sunlight are non-negotiable, but here's the trick: position your iris to catch the 4 hours of afternoon sun specifically.
- Planting Precision: When creating that 1-inch deep hole, don't just eyeball it—use a ruler or measuring stick.
Frequently asked questions
Got questions about growing zebra iris plants? You’re not alone! Here are some of the most common queries—and their answers—to help you cultivate stunning striped blooms with confidence.
How do I know if my zebra iris is getting enough sunlight?
Zebra iris plants love sunlight—think 6 to 8 hours of direct sun daily. If their leaves look pale or blooms are sparse, they’re probably not getting enough light. Yellowing leaves or crispy edges? Too much sun (especially in scorching afternoons). Try a spot with morning sun and afternoon shade for balance.
When is the best time to plant zebra iris bulbs?
Plant them in early spring or fall, when soil temps are cool (50–60°F). Avoid summer heat, which can stress the bulbs. If you’re in a mild climate, fall planting (6–8 weeks before frost) gives roots time to establish before winter. Pro tip: Don’t bury them too deep—just 2–3 inches below soil level!
How often should I water zebra iris plants?
Water deeply but infrequently—about once a week (more in extreme heat). These plants are drought-tolerant once established, so soggy soil leads to rot. Yellowing leaves? Check for overwatering. Let the top inch of soil dry out between waterings, and reduce watering after blooming to encourage next year’s flowers.
What pests or diseases should I watch for with zebra iris?
Keep an eye out for iris borers (tiny moth larvae that tunnel into rhizomes) and aphids (sap-sucking pests on leaves). For borers, remove and destroy infested leaves in late summer. Aphids? Spray with soapy water or introduce ladybugs. Fungal issues like leaf spot? Improve airflow and avoid overhead watering.
Can I grow zebra iris in containers, or do they need garden beds?
Yes! They thrive in containers with drainage holes, especially in colder climates where you can move them indoors during winter. Use a well-draining potting mix and a pot at least 12 inches deep. Just know: container-grown irises may bloom less than those in garden beds, but they’re still stunning and low-maintenance.
Wrapping up and next steps
Zebra iris plants bring bold, eye-catching beauty to any garden with their striking striped blooms and easy-care nature. Whether you're a seasoned gardener or just starting, these sun-loving perennials are a fantastic choice for adding drama and texture to your outdoor space. 🌸
Ready to transform your garden? Start by gathering your supplies, choosing the perfect spot, and following the simple steps to plant and care for your zebra iris.
With a little patience, you’ll soon be rewarded with vibrant blooms that turn heads—and maybe even inspire your neighbors to start their own!